How to determine the VMWare ESX Version from commandline Linux.

Simple!

1. Ensure you have dmidecode installed. if not install it, for CentOS (yum install dmidecode).
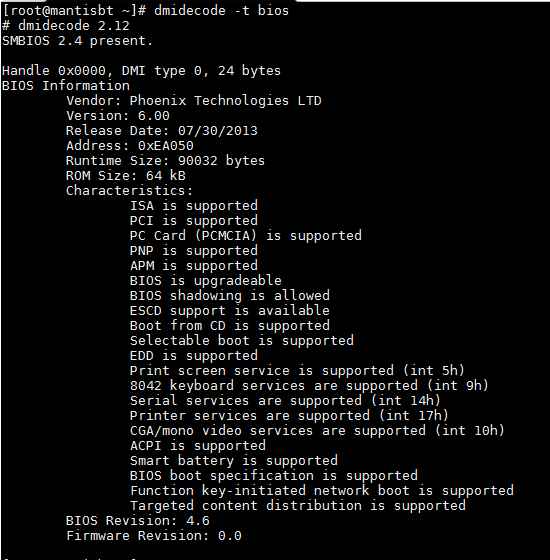
2. Type in commandline dmidecode and it will throw a list information about your hardware recorded in the BIOS for you. Since you want only the ESX Version, you can filter info by issuing “dmidecode -t bios” (without the quote)
bios
3. just look at “Address”
address
4. You can see from the pic above, I have Address: 0xEA050, compare it on the version mapping below

“0xE8480” = “ESX 2.5”
“0xE7C70” = “ESX 3.0”
“0xE7910” = “ESX 3.5”
“0xE7910” = “ESX 4”
“0xEA550” = “ESX 4U1”
“0xEA2E0” = “ESX 4.1”
“0xE72C0” = “ESXi 5”
“0xEA0C0” = “ESXi 5.1”
“0xEA050” = “ESXi 5.5”

5. so in my case I’m using ESXi 5.5!

That’s it!

How to setup gateway Centos 6 commandline

If you’ve just finished setting up your Centos and completed the network configuration from my previous post. You are probably wondering why your internet is down again after you have restarted your VM. Reason is, you probably haven’t setup any gateway yet. To set the gateway you need to open and edit the file with your favorite editor, in my case “vim” editor.

vi /etc/sysconfig/network

add the line

GATEWAY=

then issue an

/etc/init.d/network restart

make sure you are root user.

New VM – Centos no internet?

So you have finally completed setting up your first vm and installed Centos 6 (minimal version) but having problem with internet connection?

We’ll you might hit the same issue as mine. not to worry as you just need to do extra configuration for the network.

Steps:

1. Open this file with your favorite editor for my case im using vim editor

vi /etc/sysconfig/network-scripts/ifcfg-eth0

2. Change the values

ONBOOT=no
NM_CONTROLLED=yes

to

ONBOOT=yes
NM_CONTROLLED=no

Note: some distribution has quote, just follow the quote if yours got.

3. Save and exit the editor

4. restart the network service

/etc/init.d/network restart

5. ping any website and see if internet works.

ping google.com

include_path not working – php centos

Have you been banging your head on the wall for days, trying to figure out why your include_path in php.ini is not workin? and you have tried …

1. restarting your apache/nginx
2. and verified that you are editing correct file
3. and doubled check the phpinfo() and include path is correctly set
4. and tried checking the get_include_path() whether it’s including it at run time?

Well there’s one more thing you haven’t done!

late that i know that this is not a PHP nor apache/nginx issue.

happenss to be an OS issue! for my case im using Centos 6 and i happen to discover from a friend that Centos ships with SELinux. what’s SELinux?? check out here for the explanation => http://www.cyberciti.biz/faq/howto-turn-off-selinux/

You have to disable the SELinux for apache to be able to work outside the public path!

Give it a try!

How to set up nginx load balancer

Load balancer is a very useful feature in distributing incoming traffic to several servers. why would you want to do that?

By splitting load or by redirecting visitors to several active machines in a round robin effect, redundancy is achieved. (this ensures users/visitors doesn’t experience downtime on your server) . The Round Robin algorithm for load balancing sends visitors to one of a set of IPs.

A basic Round Robin feature is fairly easy to implement, it distributes server load without the worry of user experiencing server response time and server downtime. A sample below could help you setup a basic load balancing feature.

First this is you need to have nginx installed.

Setup
1. open you website’s nginx conf file

2. include the upstream module which looks like this:

upstream backend  {
  server vps1.example.com;
  server vps2.example.com;
  server vps3.example.com;
}

3. reference the module in the configuration:

server {
  location / {
    proxy_pass  http://backend;
  }
}

4. Restart nginx

Load Weight
If you have several server of different specs that will be load balanced, and wanting to distribute the user in proportion. Nginx can assign a number specifying the proportion of traffic that should be directed to each server.

A load balanced setup that included server weight can look like this:

upstream backend  {
  server vps1.example.com weight=1;
  server vps2.example.com weight=2;
  server vps3.example.com weight=4;
}

IP Hash
IP hash allows servers to respond to visitors according to their IP address, then sending visitors back to the same server each time they visit (unless the server is down). If a server is not active it will be marked as down. All users that were supposed to connect to the down server will be then directed to an alternate active/alive servers.

upstream backend {
  ip_hash;
  server   vps1.example.com;
  server   vps2.example.com;
  server   vps3.example.com  down;
 }

Max Fails

Max Fail helps instructs nginx to redirect user to a new server with certain conditions met. In the example below I will be sharing 2 basic directives max_fails and fall_timeout.

max_fails – refers to the maximum number of failed attempts to connect to a server should occur before it is considered inactive.
fail_timeout – sets the time during which the specified number of unsuccessful attempts to communicate with the server should happen to consider the server inactive, By default, the parameter is set to 10 seconds. definitions from http://nginx.org/en/docs/http/ngx_http_upstream_module.html

A sample configuration might look like this:

upstream backend  {
  server vps1.example.com max_fails=3  fail_timeout=15s;
  server vps2.example.com weight=2;
  server vps3.example.com weight=4;
}
Finding Apache httpd.conf file location

It’s been quite sometime since i’ve used apache, I’ve been enjoying nginx so far but had to switch back to apache for a project. just a quick tip for those who are working with Apache. Sometimes we are forced to work with a server that we are unfamiliar of interms of configuration/settings/installation and asked where to find the Apache configuration file is on a given server. so I usually do:

$ ps -ef | grep apache

which will give me the list of process like this

coolguy@mbpro:/$ ps -ef | grep apache

apache 14305 22691 11 21:22 ? 00:00:00 /usr/local/httpd-2.2.4/bin/httpd -k start
apache 14341 22691 0 21:22 ? 00:00:00 /usr/local/httpd-2.2.4/bin/httpd -k start
apache 14374 22691 1 21:22 ? 00:00:00 /usr/local/httpd-2.2.4/bin/httpd -k start

or in other linux flavor / installation path

root 4053 1 0 02:34 ? 00:00:04 /usr/sbin/apache2 -k start
www 6789 14053 0 12:00 ? 00:00:00 /usr/sbin/apache2 -k start
www 6790 14053 0 12:00 ? 00:00:00 /usr/sbin/apache2 -k start

...

after seeing the list you can have a clue now 🙂 Then simply run


$ /usr/local/httpd-2.2.4/bin/httpd -V
or
$ /usr/sbin/apache2 -V

and then you will get the details you need…

Server compiled with....
-D SERVER_CONFIG_FILE="/etc/apache2/apache2.conf"

There you go. Do you have another faster method? Please do let me know.

Viewing a .gz file directly using Less

one way to view a file in Linux is via Less, but what if you want to less a .gz file?

one way to do it is to extract the gz file then execute a Less on the extracted file,

however another method i would like to share is the LESSOPEN env variable.

Less will auto detect if the environment variable is present then uses it.

try executing in your command line.

export LESSOPEN="|gzip -cdfq %s"

then less a .gz file.

You wounldnt want to exec the export again again, you may automate this by including this in your bash profile

Enjoy the power of LESSOPEN!

Map Network Drive in Linux

Are you wondering how to do a Map Network Drive in Linux?

It’s called “mount”ing in Linux. There’s a command called mount in linux that helps you maps a network drive to your machine.

if the server you need to mount is also a linux server. try this command

mount -t cifs -o username=UsernameHere,password='PasswordHere' //server-name or ip/Path /your/directory/in/current/dir/

“/your/directory/in/current/dir/” – can be an ln or a directory and has to be present, this is called the mount point on your current server

Refer to the mount.cifs manual page for more info ( man mount.cifs )

Enjoy!

Setup vsftpd user default dir (CentOS)

Hi,

Today, I’m sharing how to simply setup the default directory of your vsftpd user on CentOS.

1. Edit vsftpd.conf

vi /etc/vsftpd/vsftpd.conf

2. Add the line

user_config_dir=/etc/vsftpd/vsftpd_user_conf

3. Create a dir, and change directory to the created dir

mkdir /etc/vsftpd/vsftpd_user_conf; cd /etc/vsftpd/vsftpd_user_conf/

4. Create a file with the username as filename of the vsftpd user

vi username

5. Add the line

local_root=/var/www/html

You’re done! Once the user logs in, the file you’ve just created will be used to read as config parameter. I believe it should also work with other flavour of Linux, only the vsftpd installation are different.

(for more info just man vsftpd.conf)

Cheers!