phpBB 3.2 nginx config

Hi I’m fairly new (again) to phpBB forum, why? because I never use it since 14years ago.

For those who are looking for the nginx configuration, i’m sharing mine below

I’ve omitted the part of the installer location block.

To those who will be installing from scratch, you will need to add the installer location block, please google it.

Please take note as well on the “# rewrite for SEO PLugin” part , .

rewrite ^/(.*)-f([0-9]*)/(.*)-t([0-9]*)-s([0-9]*).html /viewtopic.php?f=$2&t=$4&start=$5&$query_string last;
rewrite ^/(.*)-f([0-9]*)/(.*)-t([0-9]*).html /viewtopic.php?f=$2&t=$4&$query_string last;
rewrite ^/(.*)-f([0-9]*)/index-s([0-9]*).html /viewforum.php?f=$2&start=$3&$query_string last;
rewrite ^/(.*)-f([0-9]*)/ /viewforum.php?f=$2&$query_string last;
rewrite ^/(.*)-f([0-9]*) /viewforum.php?f=$2&$query_string last;

This is for the requirement for SEO url extension from https://github.com/tas2580/seourls, therefore remove it if you don’t plan to use the extension.

   # The actual board domain.
    server {
        #listen 80;
        server_name yourdomain.com;
        client_max_body_size 20m;

        root /path/to/your/phpbb;

        location / {
           # phpBB uses index.htm
           index index.php index.htm index.html;
           # rewrite for SEO PLugin
           rewrite ^/(.*)-f([0-9]*)/(.*)-t([0-9]*)-s([0-9]*).html /viewtopic.php?f=$2&t=$4&start=$5&$query_string last;
           rewrite ^/(.*)-f([0-9]*)/(.*)-t([0-9]*).html /viewtopic.php?f=$2&t=$4&$query_string last;
           rewrite ^/(.*)-f([0-9]*)/index-s([0-9]*).html /viewforum.php?f=$2&start=$3&$query_string last;
           rewrite ^/(.*)-f([0-9]*)/ /viewforum.php?f=$2&$query_string last;
           rewrite ^/(.*)-f([0-9]*) /viewforum.php?f=$2&$query_string last;
           try_files $uri $uri/ @rewriteapp;
        }

        location @rewriteapp {
            rewrite ^(.*)$ /app.php/$1 last;
        }

        # Deny access to internal phpbb files.
        location ~ /(config\.php|common\.php|includes|cache|files|store|images/avatars/upload) {
            deny all;
            # deny was ignored before 0.8.40 for connections over IPv6.
            # Use internal directive to prohibit access on older versions.
            internal;
        }

        # Pass the php scripts to fastcgi server specified in upstream declaration.
        location ~ \.php(/|$) {
            # Unmodified fastcgi_params from nginx distribution.
            include fastcgi_params;
            # Necessary for php.
            fastcgi_split_path_info ^(.+\.php)(/.*)$;
            fastcgi_param PATH_INFO $fastcgi_path_info;
            fastcgi_param SCRIPT_FILENAME $realpath_root$fastcgi_script_name;
            fastcgi_param DOCUMENT_ROOT $realpath_root;
            try_files $uri $uri/ /app.php$is_args$args;
            fastcgi_pass 127.0.0.1:9000;
        }

        # Deny access to version control system directories.
        location ~ /\.svn|/\.git {
            deny all;
            internal;
        }
    }
How to determine the VMWare ESX Version from commandline Linux.

Simple!

1. Ensure you have dmidecode installed. if not install it, for CentOS (yum install dmidecode).
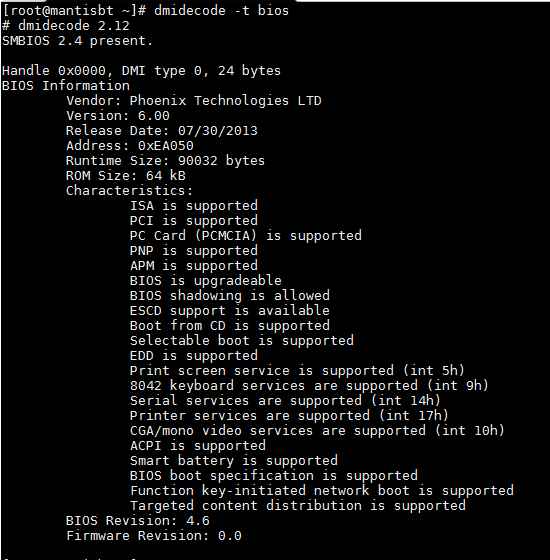
2. Type in commandline dmidecode and it will throw a list information about your hardware recorded in the BIOS for you. Since you want only the ESX Version, you can filter info by issuing “dmidecode -t bios” (without the quote)
bios
3. just look at “Address”
address
4. You can see from the pic above, I have Address: 0xEA050, compare it on the version mapping below

“0xE8480” = “ESX 2.5”
“0xE7C70” = “ESX 3.0”
“0xE7910” = “ESX 3.5”
“0xE7910” = “ESX 4”
“0xEA550” = “ESX 4U1”
“0xEA2E0” = “ESX 4.1”
“0xE72C0” = “ESXi 5”
“0xEA0C0” = “ESXi 5.1”
“0xEA050” = “ESXi 5.5”

5. so in my case I’m using ESXi 5.5!

That’s it!

Amazon EC2 storage attached Volume size is not same as configured

Newly setting up an Amazon instance was assigned with 30GB yet showing only less?

try checking the partition using df command.

[root@ip-xxxxx centos]# df -h
Filesystem Size Used Avail Use% Mounted on
/dev/xvda1 7.8G 666M 6.7G 9% /
tmpfs 498M 0 498M 0% /dev/shm
[root@ip-xxxxx centos]# resize2fs /dev/xvda1

then try issuing lsblk to check your total block size

You’ll see from that output what the name of the disk is of your root partition. For example, you probably see something like this:

xvde 202:64 0 30G 0 disk
└─xvda1 202:65 0 8G 0 part /

To make xvda1 use the whole available space from xvda. Here’s how to resize your partition:

fdisk /dev/xvda (the disk name, not your partition) This enters into the fdisk utility.

Choose the following options

u #Change the display to sectors
p #Print info
d #Delete the partition
n #New partition
p #Primary partition
1 #Partition number
2048 #First sector
Press Enter to accept the default
p #Print info
a #Toggle the bootable flag
1 #Select partition 1
w #Write table to disk and exit
Now, reboot your instance: reboot

once it’s back, verify the new disk size: df -h

How to setup gateway Centos 6 commandline

If you’ve just finished setting up your Centos and completed the network configuration from my previous post. You are probably wondering why your internet is down again after you have restarted your VM. Reason is, you probably haven’t setup any gateway yet. To set the gateway you need to open and edit the file with your favorite editor, in my case “vim” editor.

vi /etc/sysconfig/network

add the line

GATEWAY=

then issue an

/etc/init.d/network restart

make sure you are root user.

New VM – Centos no internet?

So you have finally completed setting up your first vm and installed Centos 6 (minimal version) but having problem with internet connection?

We’ll you might hit the same issue as mine. not to worry as you just need to do extra configuration for the network.

Steps:

1. Open this file with your favorite editor for my case im using vim editor

vi /etc/sysconfig/network-scripts/ifcfg-eth0

2. Change the values

ONBOOT=no
NM_CONTROLLED=yes

to

ONBOOT=yes
NM_CONTROLLED=no

Note: some distribution has quote, just follow the quote if yours got.

3. Save and exit the editor

4. restart the network service

/etc/init.d/network restart

5. ping any website and see if internet works.

ping google.com

include_path not working – php centos

Have you been banging your head on the wall for days, trying to figure out why your include_path in php.ini is not workin? and you have tried …

1. restarting your apache/nginx
2. and verified that you are editing correct file
3. and doubled check the phpinfo() and include path is correctly set
4. and tried checking the get_include_path() whether it’s including it at run time?

Well there’s one more thing you haven’t done!

late that i know that this is not a PHP nor apache/nginx issue.

happenss to be an OS issue! for my case im using Centos 6 and i happen to discover from a friend that Centos ships with SELinux. what’s SELinux?? check out here for the explanation => http://www.cyberciti.biz/faq/howto-turn-off-selinux/

You have to disable the SELinux for apache to be able to work outside the public path!

Give it a try!

eclipse mars Unhandled event loop exception

Can’t make your newly downloaded eclipse mars to work?

Are you facing an error “Unhandled event loop exception No more handles” prompt when focusing on the texteditor area of eclipse?

error1

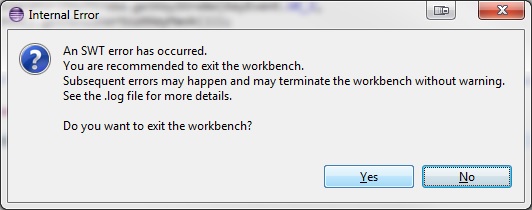
then followed by SWT error asking you to close the workbench?

error2

You are not alone, last time I got this error, some say it’s related to multiple monitor configuration, however for my case I notice it went away after I had closed my Teamviewer application but I the problem is need the Teamviewer on all the time. So after googling around, I manage to find the solution and it was only a simple windows update!

Seems like it’s a windows related bug. after the update eclipse worked, even with my teamviewer is on.